
A guide to NVIDIA’s GPU Operator
I’ve spent a significant amount of time working with GPUs in Kubernetes. As I was building MLNative, I found Nvidia’s GPU Operator a go-to solution when working with multiple clouds. Unfortunately, Nvidia’s documentation leaves much to be desired. In this guide, I will cover the following:
- What is the GPU Operator
- What are the individual components & how do they work together
- How to use the GPU Operator
- Common pitfalls & troubleshooting
What is the GPU Operator?
The GPU Operator is a Kubernetes Operator for automatically provisioning and managing Nvidia GPU’s on top of Kubernetes. Once fully initialized, GPU’s are exposed as resources available on Kubernetes nodes. As simple as this sounds, it’s easier said than done:
- Different cloud providers use different sets of node images and driver versions
- Some cloud providers allow you to use dedicated node images with GPU’s initialized, while others don’t
- The drivers offered by the vendors might be outdated and not support the GPU you’re trying to use
- The initialization of each GPU requires various libraries and binaries to be available on the host
Most of these issues are non-existent when leveraging the GPU Operator. It completely abstracts the platform you’re on, which means you no longer need to care whether you’re running on GCP, AWS, or on-premise. This is a huge win from a developer’s perspective.
GPU Operator components
It is important to point out that the GPU Operator bundles together a set of different technologies from Nvidia. Pretty much all of these can be installed individually. These components are:
- NVIDIA GPU Operator - Orchestrates everything else.
- NVIDIA GPU Driver - The Nvidia Driver allows for interacting with the GPU from the operating system level.
- NVIDIA Container Toolkit - Allows interaction with the GPU from containerized environments
- NVIDIA Device Plugin - Exposes the GPU to the kubelet api via the device plugin mechanism.
- NVIDIA GPU feature discovery - Detects and labels GPU-enabled nodes.
- NVIDIA Data Center GPU Manager - Exposes the GPU metrics
That’s a lot of components. Let’s separate them into two categories - the necessary, and the optional ones. For practical purposes, only the driver, container toolkit, and device plugin are mandatory for getting the GPUs to work with k8s.
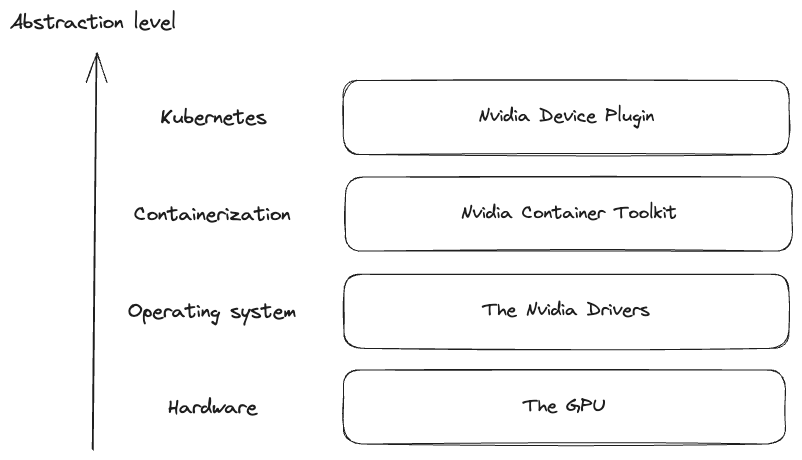
This chart roughly explains how these components work together - I’m pretty sure that the reality is more complex than this, but this simplification makes it much easier to understand what’s going on. Much like we have different abstractions for interacting with regular physical hardware (assembly, native code, native library and so on), the same holds true for GPUs.
It also means that the components higher in this tree have a dependency on the lower ones - ex. you need to have the drivers installed for the device plugin to work.
Usage guide
First steps
Nvidia lists a ton of options and components in the docs. Let’s start by simply installing the operator with helm:
helm install gpu-operator nvidia/gpu-operator -n gpu-operator --create-namespace
On a cluster with no GPU nodes, we initially get 3 resources:
$ kubectl get pods -n gpu-operator
NAME                                                          READY   STATUS    RESTARTS   AGE
gpu-operator-7f66586c-92456                                   1/1     Running   0          11s
gpu-operator-node-feature-discovery-master-58cfbd8767-wd54m   1/1     Running   0          11s
gpu-operator-node-feature-discovery-worker-grkxz              1/1     Running   0          11s
- The actual
gpu-operator- a supervision & reconcilliation service node-feature-discoveryrunning in master-slave mode. A worker is spawned on each cluster node, tasked with detecting physical GPU’s attached to the node.
Once the node-feature-discovery daemon detects the GPU, it will label the node with relevant labels (ex. nvidia.com/gpu.deploy.device-plugin=true), depending on the operator configuration. Then, the actual GPU operator components will be deployed via daemonsets.
As mentioned earlier, we need at least 3 components to interact with our GPU: the driver, the container toolkit and the device plugin.
Nvidia Driver
The Nvidia driver is ultimately a bunch of files on the host filesystem - it doesn’t require any process to be running. The daemonset which is deployed is only responsible for installing the drivers on the host. It’s also only going to start, if the drivers are not found or are outdated - ex. on AKS the drivers come preinstalled out of the box, but on GKE you will get a pod that will install the latest drivers.
You can check if the driver installation was succesful by inspecting the logs:
$ kubectl logs nvidia-driver-daemonset-f4llt | grep Driver
Uncompressing NVIDIA Accelerated Graphics Driver for Linux-x86_64 535.86.10
[ 4491.727783] nvidia-modeset: Loading NVIDIA Kernel Mode Setting Driver for UNIX platforms  535.86.10  Wed Jul 26 23:01:50 UTC 2023
Installing 'NVIDIA Accelerated Graphics Driver for Linux-x86_64' (535.86.10):
Driver file installation is complete.
Installation of the kernel module for the NVIDIA Accelerated Graphics Driver for Linux-x86_64 (version: 535.86.10) is now complete.
The driver pod will keep on running, but it’s job is done at this point.
If you exec into the driver installation pod, you can find all sorts of binaries - a notable one is nvidia-smi.
nvidia-smi is very useful for identifying various issues and retrieving general information about the GPU:
root@nvidia-driver-daemonset-f4llt:/drivers/NVIDIA-Linux-x86_64-535.86.10# ./nvidia-smi
Tue Sep 26 12:59:51 2023
+---------------------------------------------------------------------------------------+
| NVIDIA-SMI 535.86.10              Driver Version: 535.86.10    CUDA Version: 12.2     |
|-----------------------------------------+----------------------+----------------------+
| GPU  Name                 Persistence-M | Bus-Id        Disp.A | Volatile Uncorr. ECC |
| Fan  Temp   Perf          Pwr:Usage/Cap |         Memory-Usage | GPU-Util  Compute M. |
|                                         |                      |               MIG M. |
|=========================================+======================+======================|
|   0  Tesla P100-PCIE-16GB           On  | 00000000:00:04.0 Off |                    0 |
| N/A   37C    P0              29W / 250W |      0MiB / 16384MiB |      0%      Default |
|                                         |                      |                  N/A |
+-----------------------------------------+----------------------+----------------------+

+---------------------------------------------------------------------------------------+
| Processes:                                                                            |
|  GPU   GI   CI        PID   Type   Process name                            GPU Memory |
|        ID   ID                                                             Usage      |
|=======================================================================================|
|  No running processes found                                                           |
+---------------------------------------------------------------------------------------+
You can find here a bunch of useful details, such as the GPU temperature, running processes and so on. There is also the CUDA version, which we haven’t mentioned so far. CUDA is a programming platform for interacting with the GPUs that most popular high-level languages and frameworks use. Making sure that the CUDA version is high enough is crucial. The supported CUDA version is directly tied to the driver version. You can find more details here
Note - if nvidia-smi does not specify the name of the GPU, most likely your driver version does not support it.
Nvidia Container Toolkit
The container toolkit will first perform an init check to verify that the driver is installed, and will only start the installation of the container toolkit if that’s true. Until the driver is found on the host, it will continously loop on the init container.
Once the driver is located, it installs the Nvidia Container Toolkit onto the host via a volume mount:
time="2023-09-25T06:19:26Z" level=info msg="Installing NVIDIA container toolkit to '/usr/local/nvidia/toolkit'"
Similarly to the driver, the container toolkit is just a bunch of files that need to be present on the host:
root@nvidia-container-toolkit-daemonset-7xjpl:/work# ls -al /usr/local/nvidia/toolkit/
total 25236
drwxr-xr-x 3 root root    4096 Sep 25 12:13 .
drwxr-xr-x 3 root root    4096 Sep 25 12:13 ..
drwxr-xr-x 3 root root    4096 Sep 25 12:13 .config
lrwxrwxrwx 1 root root      32 Sep 25 12:13 libnvidia-container-go.so.1 -> libnvidia-container-go.so.1.13.4
-rw-r--r-- 1 root root 2959416 Sep 25 12:13 libnvidia-container-go.so.1.13.4
lrwxrwxrwx 1 root root      29 Sep 25 12:13 libnvidia-container.so.1 -> libnvidia-container.so.1.13.4
-rwxr-xr-x 1 root root  195856 Sep 25 12:13 libnvidia-container.so.1.13.4
-rwxr-xr-x 1 root root     154 Sep 25 12:13 nvidia-container-cli
-rwxr-xr-x 1 root root   47472 Sep 25 12:13 nvidia-container-cli.real
-rwxr-xr-x 1 root root     342 Sep 25 12:13 nvidia-container-runtime
-rwxr-xr-x 1 root root     203 Sep 25 12:13 nvidia-container-runtime-hook
-rwxr-xr-x 1 root root 2399688 Sep 25 12:13 nvidia-container-runtime-hook.real
-rwxr-xr-x 1 root root     346 Sep 25 12:13 nvidia-container-runtime.cdi
-rwxr-xr-x 1 root root 3163080 Sep 25 12:13 nvidia-container-runtime.cdi.real
-rwxr-xr-x 1 root root     434 Sep 25 12:13 nvidia-container-runtime.experimental
-rwxr-xr-x 1 root root 3903152 Sep 25 12:13 nvidia-container-runtime.experimental.real
-rwxr-xr-x 1 root root     349 Sep 25 12:13 nvidia-container-runtime.legacy
-rwxr-xr-x 1 root root 3163080 Sep 25 12:13 nvidia-container-runtime.legacy.real
-rwxr-xr-x 1 root root 3163080 Sep 25 12:13 nvidia-container-runtime.real
lrwxrwxrwx 1 root root      29 Sep 25 12:13 nvidia-container-toolkit -> nvidia-container-runtime-hook
-rwxr-xr-x 1 root root     100 Sep 25 12:13 nvidia-ctk
-rwxr-xr-x 1 root root 6790512 Sep 25 12:13 nvidia-ctk.real
Once the container tookit is setup, the device plugin is ready to start.
Device Plugin
The device plugin is final step of our init process. Once the container toolkit install process is completed, the nvidia-device-plugin-daemonset will start. The device plugin depends on the Nvidia Container Toolkit, it consumes the libraries and utils shared via the volume mount.
When everything starts correctly you should get a similar output:
NVIDIA_DRIVER_ROOT=/
CONTAINER_DRIVER_ROOT=/host
Starting nvidia-device-plugin
I0925 07:27:20.038101       1 main.go:154] Starting FS watcher.
I0925 07:27:20.038194       1 main.go:161] Starting OS watcher.
I0925 07:27:20.038370       1 main.go:176] Starting Plugins.
I0925 07:27:20.038379       1 main.go:234] Loading configuration.
I0925 07:27:20.038464       1 main.go:242] Updating config with default resource matching patterns.
I0925 07:27:20.038588       1 main.go:253]
Running with config:
{
  "version": "v1",
  "flags": {
    "migStrategy": "single",
    "failOnInitError": true,
    "nvidiaDriverRoot": "/",
    "gdsEnabled": false,
    "mofedEnabled": false,
    "plugin": {
      "passDeviceSpecs": true,
      "deviceListStrategy": [
        "envvar"
      ],
      "deviceIDStrategy": "uuid",
      "cdiAnnotationPrefix": "cdi.k8s.io/",
      "nvidiaCTKPath": "/usr/bin/nvidia-ctk",
      "containerDriverRoot": "/host"
    }
  },
  "resources": {
    "gpus": [
      {
        "pattern": "*",
        "name": "nvidia.com/gpu"
      }
    ],
    "mig": [
      {
        "pattern": "*",
        "name": "nvidia.com/gpu"
      }
    ]
  },
  "sharing": {
    "timeSlicing": {}
  }
}
I0925 07:27:20.038597       1 main.go:256] Retreiving plugins.
I0925 07:27:20.038967       1 factory.go:107] Detected NVML platform: found NVML library
I0925 07:27:20.038996       1 factory.go:107] Detected non-Tegra platform: /sys/devices/soc0/family file not found
I0925 07:27:20.054642       1 server.go:165] Starting GRPC server for 'nvidia.com/gpu'
I0925 07:27:20.054995       1 server.go:117] Starting to serve 'nvidia.com/gpu' on /var/lib/kubelet/device-plugins/nvidia-gpu.sock
I0925 07:27:20.056687       1 server.go:125] Registered device plugin for 'nvidia.com/gpu' with Kubelet
Once all components have finished initialization, each GPU node should be have new resources available:
$ kubectl get node aks-workspacegpu-15563590-vmss000003 -o json | jq '.status.capacity'
{
  "cpu": "4",
  "ephemeral-storage": "129886128Ki",
  "hugepages-1Gi": "0",
  "hugepages-2Mi": "0",
  "memory": "28736308Ki",
  "nvidia.com/gpu": "1",
  "pods": "110"
}
And that’s pretty much it - as soon as the "nvidia.com/gpu" resource is available, the GPU is ready to roll and the kubelet agent will start assigning gpu pods to the node.
Post-setup validation
Finally, the GPU operator spawns one more pod that checks whether everything is setup correctly:
$ kubectl get pod nvidia-operator-validator-bhc8v -o json | jq '.spec.initContainers | .[] | .name'
"driver-validation"
"toolkit-validation"
"cuda-validation"
"plugin-validation"
If all of these have passed, the operator validator will be running & print out all validations are successful. This allows for very easy observability from an application layer - we can just wait for this pod to be running before scheduling our GPU workloads.
Hints
Finally, I’d like to share some additional insights that I wish I found out about sooner:
Don’t use Docker
Even though plenty of Nvidia’s docs mention Docker, most cloud providers no longer use Docker and don’t even allow it on managed Kubernetes instances. Your best bet is sticking with containerd eveywhere.
Pick the GPU Operator over native solutions
The big 3 cloud providers (AWS, GCP, Azure) all have a ton of documentation regarding running GPUs in their clouds. They list out various ways of installing drivers, device plugins and so on. Don’t use custom images provided by the platforms. They will usually be behind Nvidia’s stuff in terms of support of latest features & drivers. Not only is it far more elegant to use the same solution everywhere, it’s also easier to manage & upgrade. Finally, you have more control over the GPU operator than with the native tools - ex. there is no way to disable the device plugin from being installed on any GPU node running on GKE.
Don’t share libraries from the host
When running GPU workloads, you need access to the CUDA libraries. Even though your host machines will contain every CUDA library that’s usually required for runtime, don’t share them from the host. This is both a security hazard, as well as a bad practice. All docker images should have all the dependencies they need in runtime bundled in.